Developer Guide
- Acknowledgements
- Setting up, getting started
- Design
-
Implementation
- Identity: A weaker notion of equality
- Immutability of Student, ModuleClass, and related classes
- Managing attributes within immutable classes
- Creating and deleting module classes
- Saving and Loading of StudentModuleData and SessionData
- Assigning students to module classes
- Unassigning students from module classes
- Grading a student for a session
- Viewing session-wise grades of a student in a class
- Tracking the state of focus mode
- Querying student grades for a session
- Exporting data as CSV file
- UI Implementation
- Documentation, logging, testing, configuration, dev-ops
- Appendix: Requirements
- Appendix: Instructions for manual testing
Acknowledgements
We’d like to thank:
- The CS2103/T teaching team for guiding us throughout the development of this project.
- SE-Edu’s AddressBook-Level3 for laying the foundations on which our (brownfield) project is built upon.
- The JavaFX, Jackson, JUnit, and Lato font project teams for their awesome work on which our product is built upon!
Setting up, getting started
Refer to the guide Setting up and getting started.
Design
.puml files used to create diagrams in this document can be found in the diagrams folder. Refer to the PlantUML Tutorial at se-edu/guides to learn how to create and edit diagrams.
Architecture
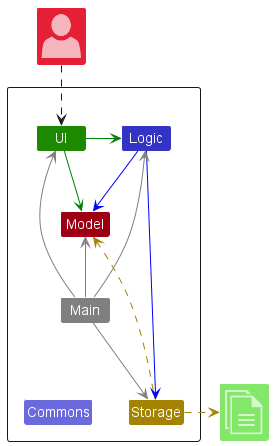
The Architecture Diagram given above explains the high-level design of the App.
Given below is a quick overview of main components and how they interact with each other.
Main components of the architecture
Main has two classes called Main and MainApp. It is responsible for:
- At app launch: Initializes the components in the correct sequence, and connects them up with each other.
- At shut down: Shuts down the components and invokes cleanup methods where necessary.
Commons represents a collection of classes used by multiple other components.
The rest of the App consists of four components.
-
UI: The UI of the App. -
Logic: The command executor. -
Model: Holds the data of the App in memory. -
Storage: Reads data from, and writes data to, the hard disk.
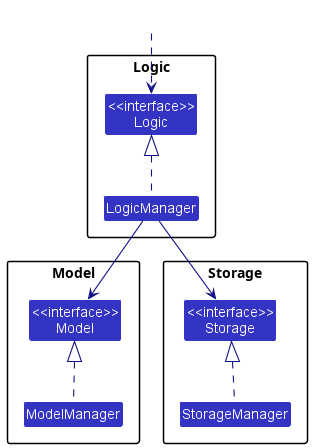
Interaction between the architecture components
The Sequence Diagram below shows how the components interact with each other for the scenario where the user issues the command delete 1.
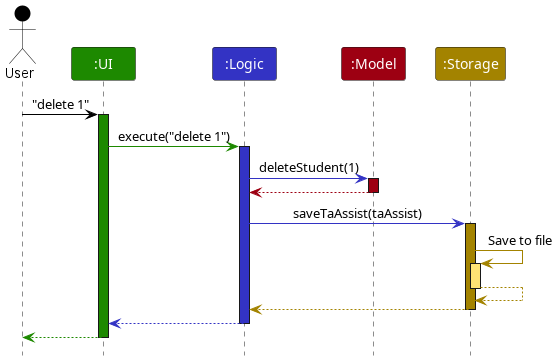
Each of the four main components (also shown in the diagram above):
- Defines its API in an
interfacewith the same name as the Component. - Implements its functionality using a concrete
{Component Name}Managerclass (which follows the corresponding APIinterfacementioned in the previous point.
For example, the Logic component defines its API in the Logic.java interface and implements its functionality using the LogicManager.java class which follows the Logic interface. Other components interact with a given component through its interface rather than the concrete class (reason: to prevent outside component’s being coupled to the implementation of a component), as illustrated in the (partial) class diagram below.
The sections below give more details of each component.
UI component
The API of this component is specified in Ui.java
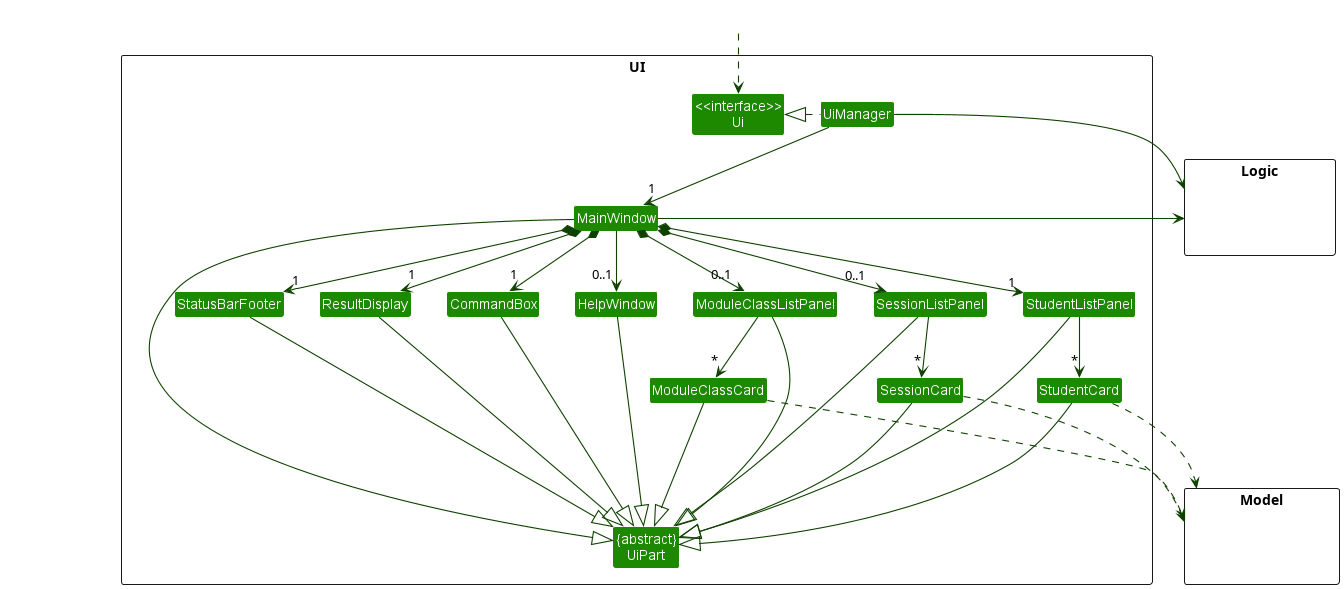
The UI consists of a MainWindow that is made up of parts e.g. CommandBox, ResultDisplay, StudentListPanel, StatusBarFooter etc. All these, including the MainWindow, inherit from the abstract UiPart class which captures the commonalities between classes that represent parts of the visible GUI.
The UI component uses the JavaFx UI framework. The layout of these UI parts are defined in matching .fxml files that are in the src/main/resources/view folder. For example, the layout of the MainWindow is specified in MainWindow.fxml
The UI component:
- Executes user commands using the
Logiccomponent. - Listens for changes to
Modeldata so that the UI can be updated with the modified data. - Keeps a reference to the
Logiccomponent, because theUIrelies on theLogicto execute commands. - Depends on some classes in the
Modelcomponent, as it displaysStudent,ModuleClassandSessionobject residing in theModel.
Logic component
API : Logic.java
Here’s a (partial) class diagram of the Logic component:
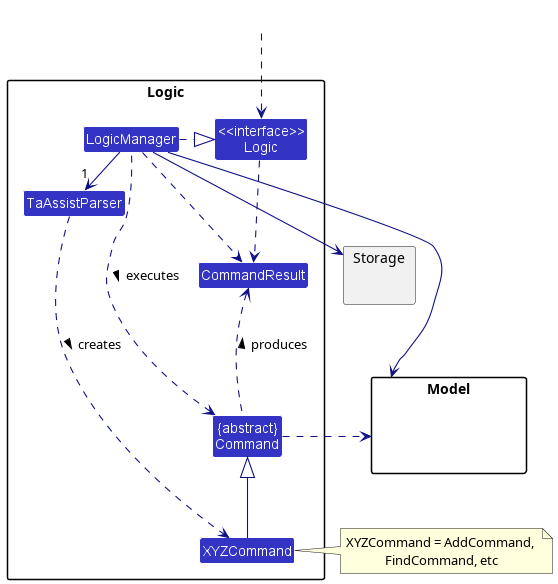
How the Logic component works:
- When
Logicis called upon to execute a command, it uses theTaAssistParserclass to parse the user command. - This results in a
Commandobject (more precisely, an object of one of its subclasses e.g.,AddCommand) which is executed by theLogicManager. - The command can communicate with the
Modelwhen it is executed (e.g. to add a student). - The result of the command execution is encapsulated as a
CommandResultobject which is returned back fromLogic.
The sequence diagram below illustrates the interactions within the Logic component for the execute("delete 1") API call.
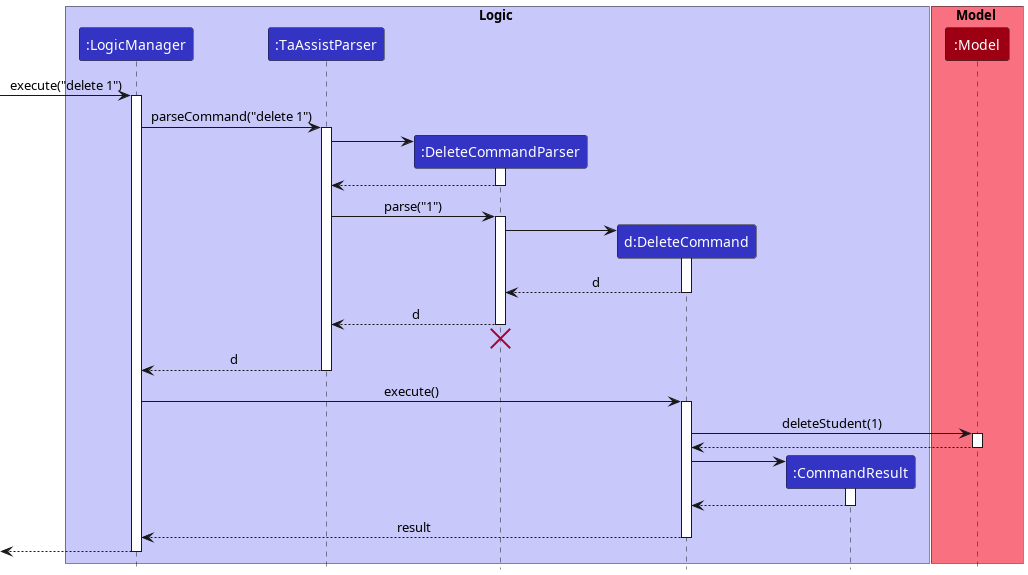
DeleteCommandParser should end at the destroy marker (X) but due to a limitation of PlantUML, the lifeline reaches the end of diagram.
Here are the other classes in Logic (omitted from the class diagram above) that are used for parsing a user command:
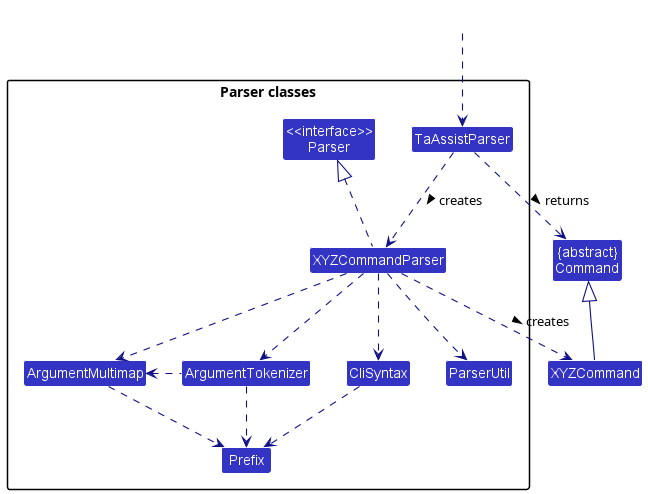
- When called upon to parse a user command, the
TaAssistParserclass creates anXYZCommandParser(XYZis a placeholder for the specific command name e.g.,AddCommandParser) which uses the other classes shown above to parse the user command and create aXYZCommandobject (e.g.,AddCommand) which theTaAssistParserreturns back as aCommandobject. - All
XYZCommandParserclasses (e.g.,AddCommandParser,DeleteCommandParser, …) inherit from theParserinterface so that they can be treated similarly where possible e.g, during testing.
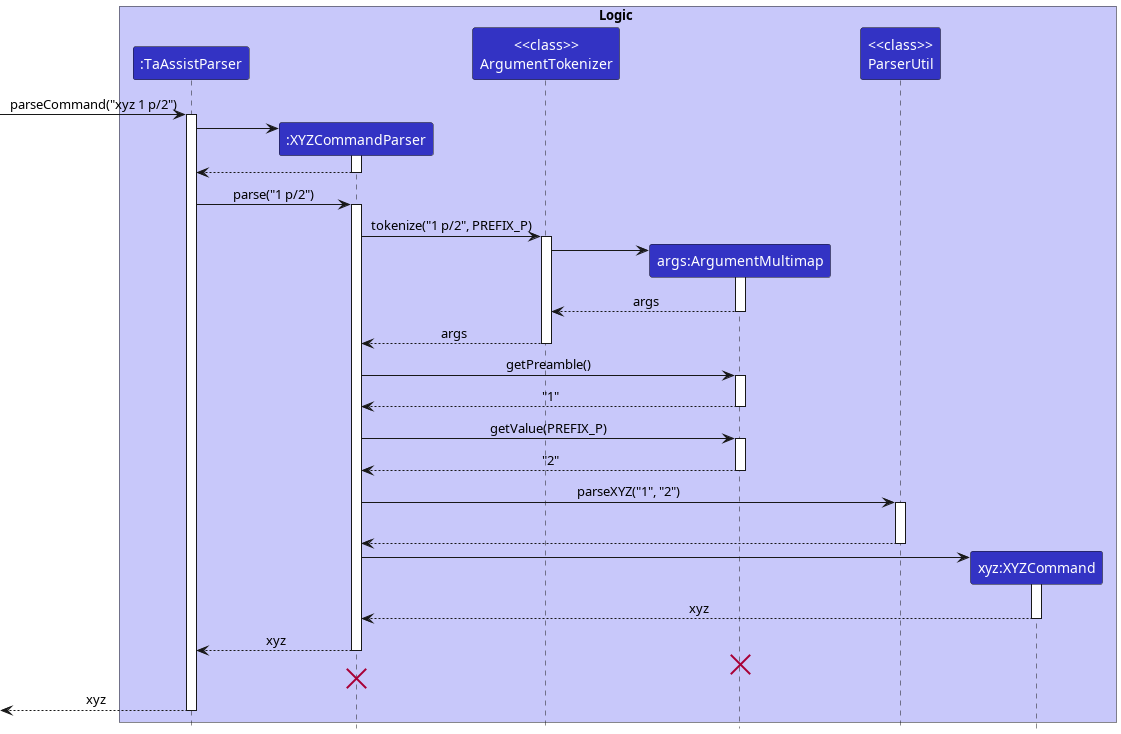
The following sequence diagram shows how a generic command XYZCommand is parsed from user input with the help of XYZCommandParser.
Model component
API : Model.java
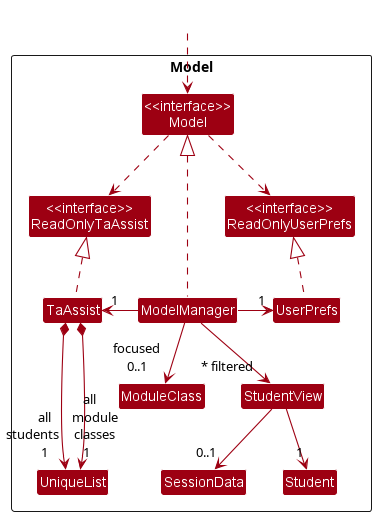
The Model component:
- Stores data in TA-Assist:
- All
Studentobjects are contained in aUniqueListobject. - All
ModuleClassobjects are also contained in aUniqueListobject.
- All
- Stores the currently ‘selected’
StudentViewobjects (e.g., results of a search query) as a separate filtered list which is exposed to outsiders as an unmodifiableObservableList<StudentView>that can be ‘observed’ e.g. the UI can be bound to this list so that the UI automatically updates when the data in the list change. - The
StudentViewobject is a class that encapsulatesStudentdata along with aSessionDatato be displayed toUI. More details regarding this class can be referred to in the Implementation section. - Stores the currently ‘focused’
ModuleClassobject. - Stores a
UserPrefobject that represents the user’s preferences. This is exposed to the outside as aReadOnlyUserPrefobjects. - Does not depend on any of the other three components (i.e.
Ui,LogicandStorage) as theModelrepresents data entities of the domain, they should make sense on their own without depending on other components.
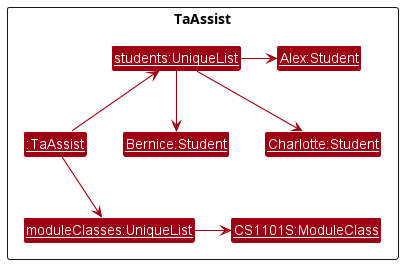
UniqueList
The UniqueList class is a generic class that stores a collection of unique elements. In TA-Assist, a UniqueList stores either all the Student objects or all the ModuleClass objects.
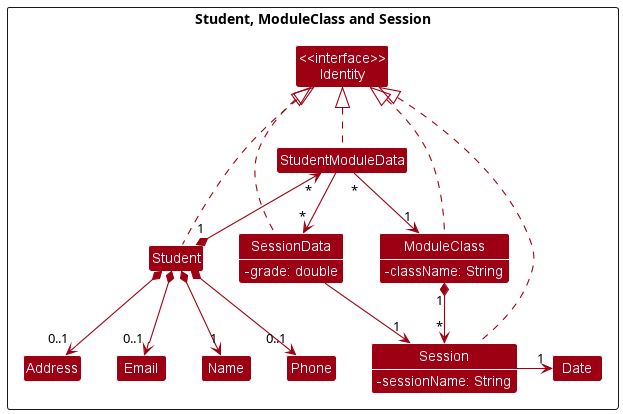
ModuleClass, Student, and related classes
Each ModuleClass object stored in Model contains a list of Session objects that are associated with the ModuleClass.
In order to store module related data, each Student object stores a list of StudentModuleData objects.
Each StudentModuleData object contains a ModuleClass object and a list of SessionData objects.
The SessionData objects contains a Session object and a grade associated with the session.
Student, ModuleClass, Session, StudentModuleData, and SessionData objects implement the Identity<T> interface which has a single isSame(T) method. The isSame(T) method allows Identity<T> objects to define a weaker notion of equality than the equals method. More details regarding this can be found in the
Implementation section.
The relationship between these classes is shown in the following class diagram:
Storage component
API : Storage.java
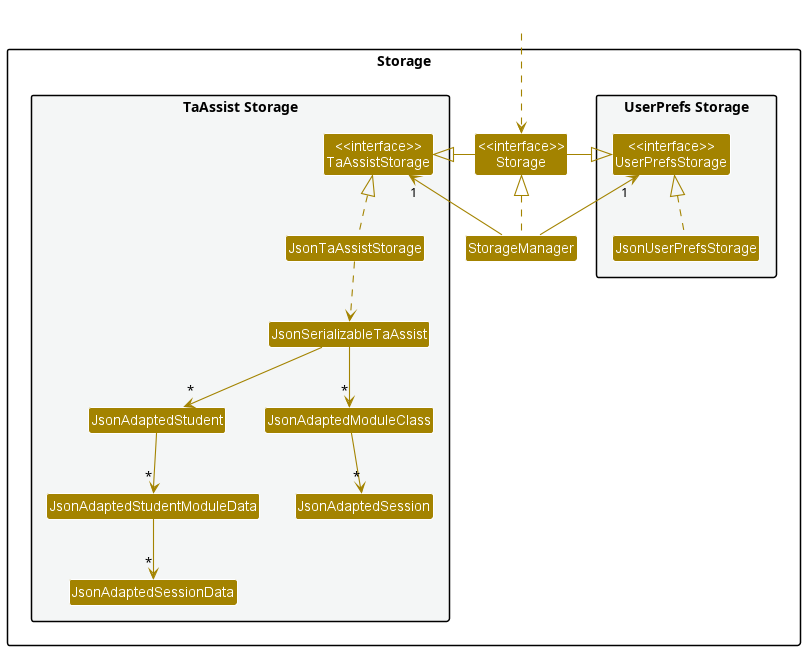
The Storage component:
- Can save both TA-Assist data and user preference data in json format, and read them back into corresponding objects.
- Inherits from both
TaAssistStorageandUserPrefStorage, which means it can be treated as either one (if only the functionality of only one is needed). - Depends on some classes in the
Modelcomponent (because theStoragecomponent’s job is to save/retrieve objects that belong to theModel)
Common classes
Classes used by multiple components are in the seedu.taassist.commons package.
Implementation
This section describes some noteworthy details on how certain features are implemented along with explanations for why certain functions are implemented in such a manner.
Identity: A weaker notion of equality
Since any modifications to an immutable object in Model would require constructing new objects, we’ll need a method to identify objects with the same identities, i.e. two ModuleClass-s have the same identity if their module codes are equal.
For instance, consider the following hypothetical scenario:
Assume the current state of TaAssist is as follows:

Now, let’s say the user wants to add a Quiz2 session to IS1103. However, since ModuleClass is immutable, we’ll have to construct a new IS1103 ModuleClass instance instead. Call this new instance NewIS1103. Hence, the state of TaAssist will now look like the one below:
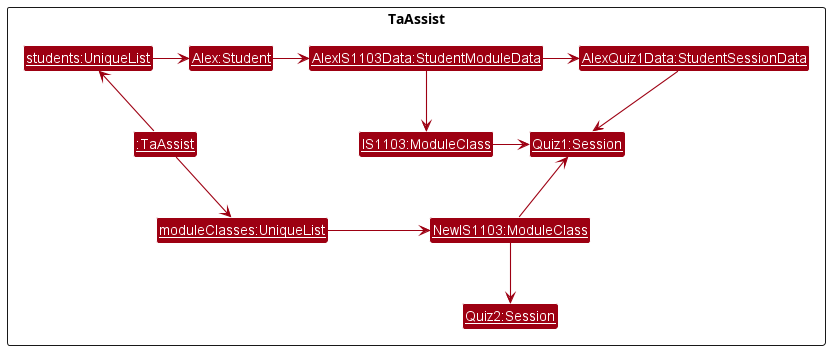
Now, notice that AlexIS1103Data is no longer referencing the same object. In addition, since their contents are different, we can’t check with the equals method, as the equals method in our codebase should perform a strict equality check, i.e. all contents of the two objects must be equal for equals to return True. Hence, there’s no way to identify whether IS1103 and NewIS1103 are inherently the same module or not.
To handle this issue, Session, ModuleClass, and Student classes implement the interface Identity<T> which contains a method isSame(T obj) used to compare whether two objects have equivalent identities, i.e. ModuleClass-es have equal identity if their module code are then same.
This Identity construct is similar to a <Key, Value> pair in a HashMap implementation, where we use the Key to determine the object’s identity and Value for its satellite values.
Immutability of Student, ModuleClass, and related classes
In the implementation of the Student, ModuleClass and other related classes, it was decided to implement them in an immutable manner.
This is done mainly for three reasons:
- Java passes its values by-reference, this can cause quite the confusion if objects returned by
Modelare mutated. - Simplifies loading data from
Storageas we do not need to ensure contents of data in one object has is referencing the same object as another. - Reduces the possibility of an unobserved mutation as data in
Modelis commonly observed byUIthrough anObservableList.
As such, if the codebase is to be extended to store additional classes within Model, it is recommended to implement them in an immutable manner unless there’s good reason not to do so.
Managing attributes within immutable classes
For each of the immutable classes, each time we modify the attributes of the class, we will construct a new instance of the class.
To streamline the process of constructing new instances, we provide add*, remove*, update* methods in the immutable classes, which will return a new instance of the class with the updated attributes.
For instance,
-
ModuleClass#addSession(session)– constructs a newModuleClasswith the providedSessionadded into the session list. -
ModuleClass#removeSession(session)– constructs a newModuleClasswith the providedSessionremoved from the session list. -
Student#addModuleClass(moduleClass)– constructs a newStudentwith the providedModuleClassadded into the module class list. -
StudentModuleData#updateGrade(session, grade)– constructs a newStudentModuleDatawith the grade of the providedSessionupdated.
In addition, methods such as addSessions and removeSessions are also provided in Model and
TaAssist to help manage sessions within a class.
For example, the following sequence diagram shows how the command adds s/Lab1 creates a Session named “Lab1” and adds it inside the focused class.
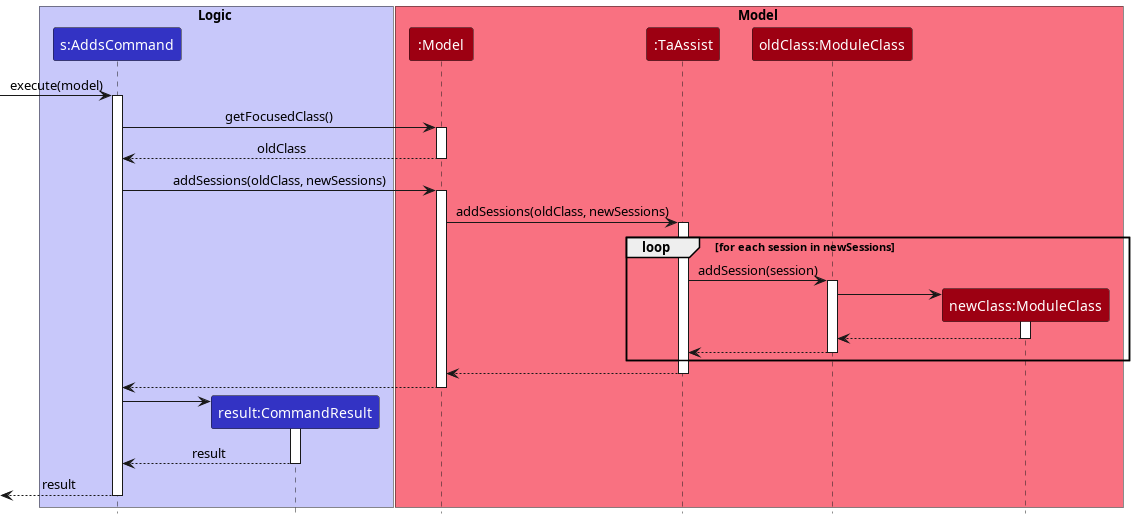
Model is currently in focus mode and
the focused class doesn’t contain a session named Lab1 as of current.
Creating and deleting module classes
Module class information is stored as ModuleClass objects, which captures the name of the module class as well as the sessions created for the module class. When the user creates a module class, the program creates a new ModuleClass object with the module class name and adds it to the collection of ModuleClass objects previously created, which is managed by the TaAssist class.
When deleting module classes, all students previously assigned to those module classes will have the module classes unassigned from them, before the ModuleClass objects corresponding to those module classes are removed from the collection captured by TaAssist.
The following methods in TaAssist manages the adding and deleting of module classes from the collection:
-
TaAssist#addModuleClass(ModuleClass moduleClass)- Adds the provided module class to the list of module classes created. -
TaAssist#removeModuleClass(ModuleClass moduleClass)- Removes the provided module class from the list of module classes created.
Saving and Loading of StudentModuleData and SessionData
When saving the data, we export all the Students and ModuleClass objects into two JSON arrays in a JSON file. The ModuleClass objects and their corresponding Session objects are saved in moduleClasses array, while the Student objects and their corresponding StudentModuleData, and SessionData objects are saved in the students array.
Each StudentModuleData and SessionData contains a reference to ModuleClass and Session objects respectively. But the way we saved the data, the actual ModuleClass and Session objects are in the moduleClasses array, while the StudentModuleData and SessionData need to be in the students array and have a way to reference the ModuleClass and Session objects.
To solve this problem, we only save the ModuleClass name for a StudentModuleData ignoring the list of
Sessions in the ModuleClass object. Similarly, for SessionData, we only save the Session name ignoring the Date.
In code level, we reference the actual ModuleClass and Session objects from Model when required.
For example, a Student object might be saved in students array as follows (ignoring some identity fields):
 {
  "name" : "Alex Yeoh",
  "moduleData" : [ {
    "module" : "CS1231S",
    "data" : [ {
      "session" : "Assignment 1",
      "grade" : 100.0
    } ]
  } ]
}
While the ModuleClass object for the module “CS1231S” might be saved in moduleClasses array as follows:
{
  "name" : "CS1231S",
  "sessions" : [ {
    "name" : "Assignment 1",
    "date" : "2020-09-01"
  } ]
}
Design considerations
-
Option 1 (Current Choice): The
StudentModuleDataandSessionDataobjects only save theModuleClassname andSessionname respectively. Because in any of their functionality, we do not need to know the list ofSessionsin theModuleClassobject or theDateof theSessionobject.-
Pros:
- The
StudentModuleDataandSessionDataobjects are independent of theModuleClassandSessionobjects stored inModel. - It makes testing easier due to the independence of the
StudentModuleDataandSessionDataobjects. - It makes loading of data easier, since we can add a
ModuleClassorSessionobject with only the name when loadingStudentModuleDataandSessionDataobjects. - According to our JSON format, it is more intuitive to let the
StudentModuleDataandSessionDataclasses only know about the names.
- The
-
Cons: The
ModuleClassandSessionobjects are duplicated, which may cause confusion when we may need to iterate on the session list in theModuleClassobject, for example. So we need to remember that the actualModuleClassandSessionobjects are stored inModeland not in theStudentModuleDataandSessionDataobjects.
-
Pros:
-
Option 2: Same as option 1, but we save the names of
ModuleClassandSessionas aString.- Pros: Makes the intention more clear that only the names are required in these classes.
-
Cons: We lose some functionality of the
ModuleClassandSessionobjects, such asisSame,toStringand other methods. In this approach, we would need to recreate them forStringinstead.
-
Option 3: While loading the data, we first load
ModuleClassobjects andStudentobjects into two separate lists. Then for eachStudentobject and eachStudentModuleDataobject, we iterate through the list ofModuleClassobjects and reference the correctModuleClassobject. Then for each of theSessionDatain theStudentModuleDataobject, we iterate through the list ofSessionsin theModuleClassobject and reference the correctSessionobject.-
Pros: The
ModuleClassandSessionobjects are not duplicated. The same object is referenced by both theModelandStudentModuleDataorSessionDataobjects. -
Cons:
- Implementation of this loading mechanism would be quite convoluted and hard to test.
- Maintaining this strong coupling can be quite challenging.
- It makes testing more difficult as we need to ensure that the
ModelandStudentModuleDataorSessionDataobjects are referencing the same object.
-
Pros: The
Assigning students to module classes
Each student object contains a collection of StudentModuleData where module classes and the grades the student obtained for the sessions of the module classes are stored. When the user assigns students to a module class, a new StudentModuleData object is created and added to the collection for each student.
Given below are the different steps taken when the user assigns students to a module class.
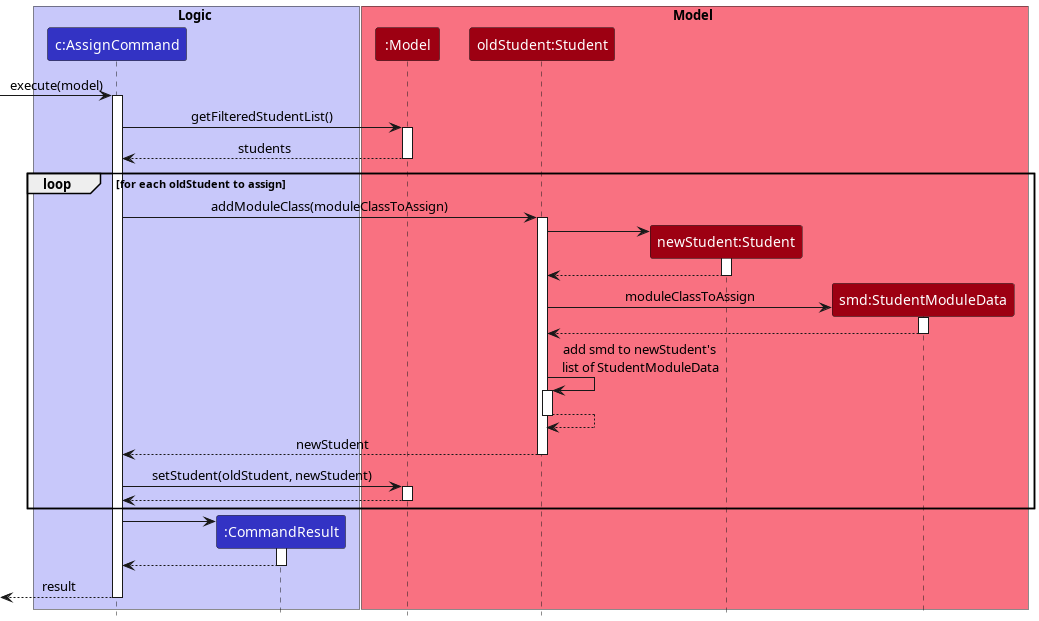
Step 1: The user input is parsed similar to other commands and an AssignCommand object is created using the given the student indices and the module class to assign them to.
Step 2: The AssignCommand object is executed. The student indices are used to retrieve the Student objects from the list of students captured by the Model. For each student, steps 3 and 4 are repeated.
Step 3: The Student#addModuleClass method is used to create a new Student object from the old Student object. The method returns the old Student if the student is already assigned to the module class. Otherwise, a new Student object is created from the old one by copying over all the data fields. Then a new instance of StudentModuleData is created with the given ModuleClass without any session information and added to the list of StudentModuleData of the new Student object. The new Student object is returned.
Step 4: The Model#setStudent method is used to replace the old Student object with the updated one in the model.
Step 5: The execution ends and returns a CommandResult object containing the success message to be displayed by the GUI to the user.
Design considerations:
-
Option 1 (Current Choice): Let each student maintain a collection of module classes that the student is being assigned to.
- Pros: Only captures necessary information, and easier to implement. This structure is also easier to capture session information for the students.
-
Cons: Will be creating multiple
StudentModuleDataobjects for a module class when multiple students are assigned to the module class. This may cause performance issues from the large number of objects created.
-
Option 2: Create a matrix of students and classes to determine which module class is assigned to which student.
- Pros: Will allow fast query to whether a student is assigned to a module class, or when looking for all the students assigned to a certain module class.
- Cons: Can possibly be storing a lot of unnecessary information. Considering the target audience of TAs, it is very unlikely for them to be teaching the same student for multiple module classes.
Unassigning students from module classes
The implementation of unassigning students from module classes is similar to how module classes are assigned to students. The difference is that in the unassigning process, the StudentModuleData of the mentioned module classes are removed from the collection of StudentModuleData maintained by the students instead.
Refer to Assigning students to module classes for more information.
Grading a student for a session
Giving grades for a session is only possible when a ModuleClass is focused. It requires updating the student’s list of
StudentModuleData, where the matching StudentModuleData with the current focused ModuleClass is updated to reflect the given grade.

Given bellow are the steps taken when the user gives grade to a student for a session:
Step 1: The user input is parsed similar to other commands and a GradeCommand object is created using the given student indices, session name, and grade.
Step 2: The GradeCommand object is executed. The given indices are used to retrieve the Student objects from the current curated list of students in Model. For each student, steps 3 to 5 are repeated.
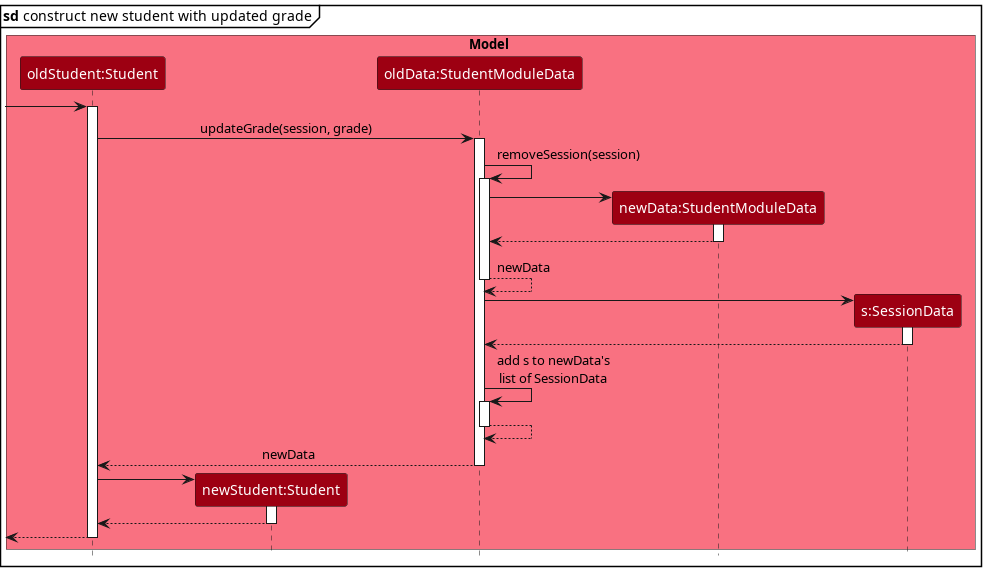
Step 3: The old Student object is used to create an updated Student object via the Student#updateGrade method. The method creates the new student with an updated list of StudentModuleData by going through the list of the old Student object’s list of StudentModuleData and updating the StudentModuleData that matches the current focused ModuleClass.
Step 4: The StudentModuleData#updateGrade method is used to create a new StudentModuleData object with the updated grade for the session. The method first creates a new StudentModuleData object which has the same list of SessionData except the one matching with the given session (if any). The method then creates a new SessionData object with the given grade and adds it to the list of SessionData in the new StudentModuleData object.
Step 5: After finishing steps 3-4, the GradeCommand will have an updated student. Then the Model#setStudent method is used to replace the old Student object with the updated one in the model.
Step 6: The execution ends and returns a CommandResult object containing the success message to be displayed by the GUI to the user.
Viewing session-wise grades of a student in a class
Viewing session-wise grades of a student is only possible when a ModuleClass is in focus. It requires going through the list of StudentModuleData of the Student object and finding the data for the matching focused class. After retrieving it, the session-wise grade can be read from the list of SessionData stored inside the StudentModuleData.
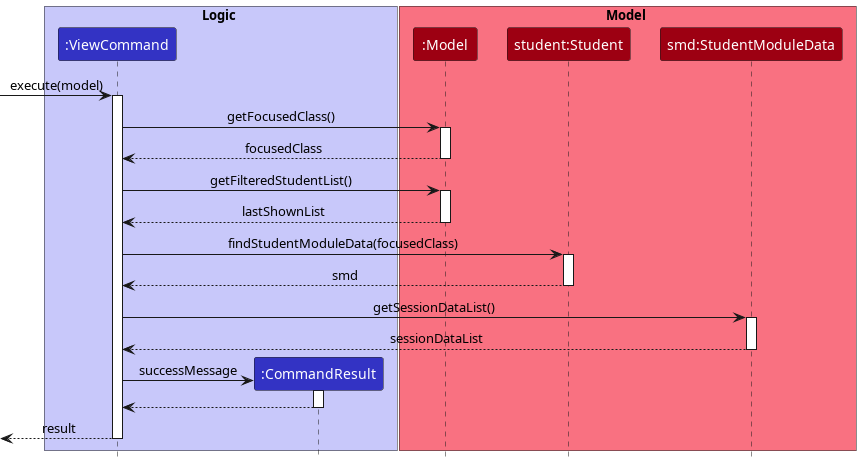
Given bellow are the steps taken when the user wants to view a student’s session-wise grades:
Step 1: The user input is parsed similar to other commands and a ViewCommand object is created using the given student index.
Step 2: The ViewCommand object is executed. The given index is used to retrieve the correct Student object from the curated list of students in Model.
Step 3: The StudentModuleData of the student that matches with the current focus class is retrieved using the Student#findStudentModuleData method. This method achieves that by searching the UniqueList with a new StudentModuleData that has the identity of the current focus class. This StudentModuleData is guaranteed to exist, since the program is in focus mode.
Step 4: The list of SessionData is retrieved from the StudentModuleData using the StudentModuleData#getSessionDataList method.
Step 5: A response message is constructed from the list of SessionData, containing all the session-wise grades of the student.
Step 6: The execution ends and returns a CommandResult object containing the constructed response to be displayed by GUI to the user.
Tracking the state of focus mode
The state of focus mode is tracked by ModelManager, which stores the current focused ModuleClass (focusedClass, as seen in the class diagram for Model). When focusedClass is null, it indicates that focus mode is inactive. ModelManager returns the state of the focus mode via the following methods:
-
ModelManager#isInFocusMode()- Checks whether focus mode is active. -
ModelManager#getFocusedClass()- Returns the currentModuleClassin focus.
The following methods in ModelManager toggles the state of the focus mode:
-
ModelManager#enterFocusMode(ModuleClass classToFocus)- Sets focus mode to be active.- This is achieved by setting
focusedClassto be a non-nullModuleClassobject. - This method assumes that
focusedClassis an existingModuleClassinTaAssist.
- This is achieved by setting
-
ModuleClass#exitFocusMode()- Sets focus mode to be inactive.- This is achieved by setting
focusedClassto benull.
- This is achieved by setting
The above methods are also exposed to the Model interface.
The Logic component calls these methods in Model to execute commands that require access to the state of the focus mode.
For example, the following sequence diagram shows how the focus command activates focus mode:
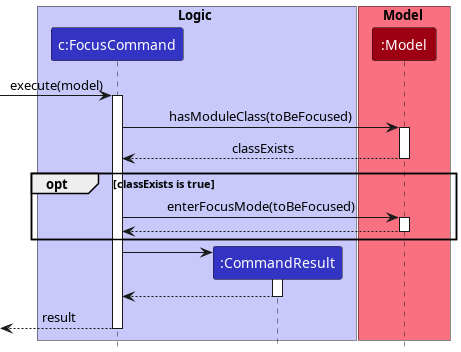
On the other hand, the unfocus command deactivates focus mode by setting focusedClass to null.
Querying student grades for a session
This feature allows the user to query student grades of a session to TaAssist. TaAssist will provide a response showing the grades of all students of the queried session.
Its implementation is facilitated by two classes:
StudentView class
StudentView encapsulates the view of a Student for the UI. It stores the Student data itself along with a SessionData if queried.
SessionData can be queried from a Student through the StudentView::withSession method. This will construct a new StudentView that encapsulates the queried SessionData.
This encapsulated SessionData internally represented with three values:
-
null:SessionDatahas not been queried - An empty
Optional:SessionDatahas been queried, but doesn’t exist inStudent. - An
Optionalencapsulating aSessionData:SessionDatahas been queried and does exist inStudent.
MappedStudentViewList class
MappedStudentViewList maps an ObservableList<Student> to an ObservableList<StudentView>.
It takes in ObservableList<Student> as a source list. Each Student in the source list will be mapped to a StudentView.
It stores two additional parameters, a ModuleClass and a Session. These parameters are used in determining which SessionData to be queried from Student and encapsulated by the resulting StudentView.
If either of these two parameters are null, MappedStudentViewList will assume no Session is being queried and the resulting StudentView will follow suit.
If the source list is modified, MappedStudentViewList will also map the new Student data accordingly and execute a fireChange to inform its listeners of a new update.
If the two parameters are modified through the MappedStudentViewList::setTarget method, MappedStudentViewList will re-map all Student to the appropriate StudentView-s and execute a fireChange to inform its listeners of a new update.
With these two classes implemented, SessionData can now be easily passed to UI by simply passing the MappedStudentViewList within ModelManager to UI. UI will then update accordingly whenever the MappedStudentViewList fires a change.
The following sequence diagram shows how changes are propagated to the UI through the chain of ObservableList-s when TaAssist::addStudent(s) is called:
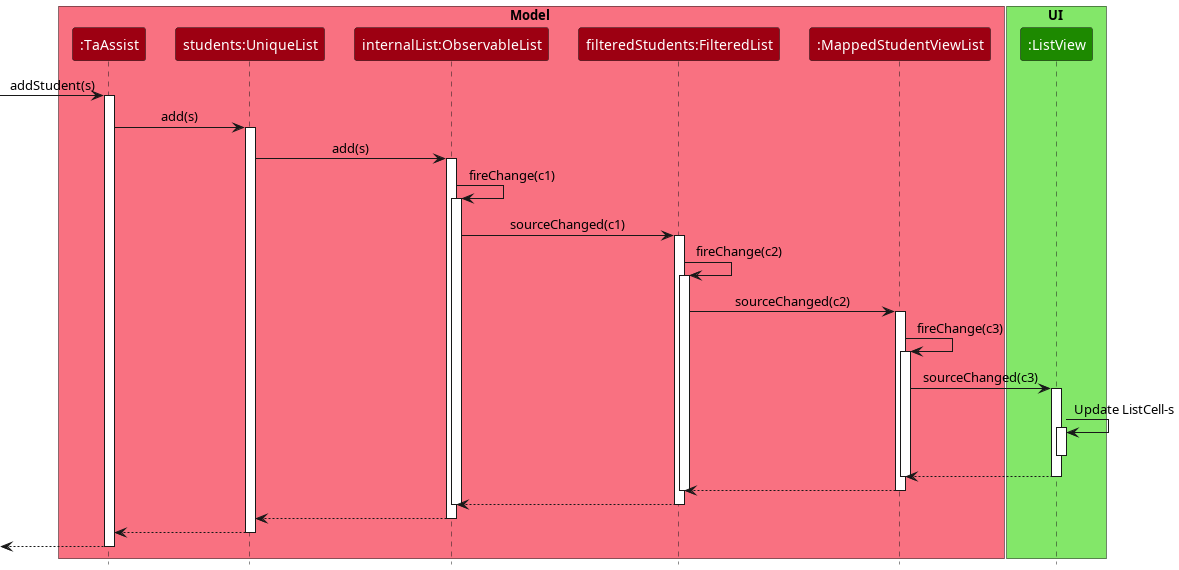
ListView interaction as it is abstracted away by JavaFX and its details are mostly irrelevant to our implementation.
Design considerations
Aspect: How query data is passed to UI:
-
Option 1 (Current Choice): Pair
StudentandSessionDatatogether in aStudentViewclass.-
Pros: With
Observablepattern, can be made to automatically update when a new student is graded. SimplifiesUIimplementation. -
Cons: Complicates design of
Modelas it adds another class just for handling the “view” of a student.
-
Pros: With
-
Option 2: Maintain two
ObservableList-s forStudentandSessionDataseperately.-
Pros: Reduces the need of a encapsulating class, which simplifies the design of
Model. - Cons: Hard to maintain. Accidental slip-up in updating one list but not the other can occur.
-
Pros: Reduces the need of a encapsulating class, which simplifies the design of
-
Option 3: Let UI query the data from
Student-
Pros:
Modelneeds no change. -
Cons: Breaks abstraction principle. Non-trivial querying of fields from
Studentshould be handled byModel.
-
Pros:
-
Option 4: Pass data through
CommandResult- Pros: Easy to implement.
-
Cons: Hard to maintain. Each
Commandnow needs to know thatCommandResultcan pass data other than for result display.
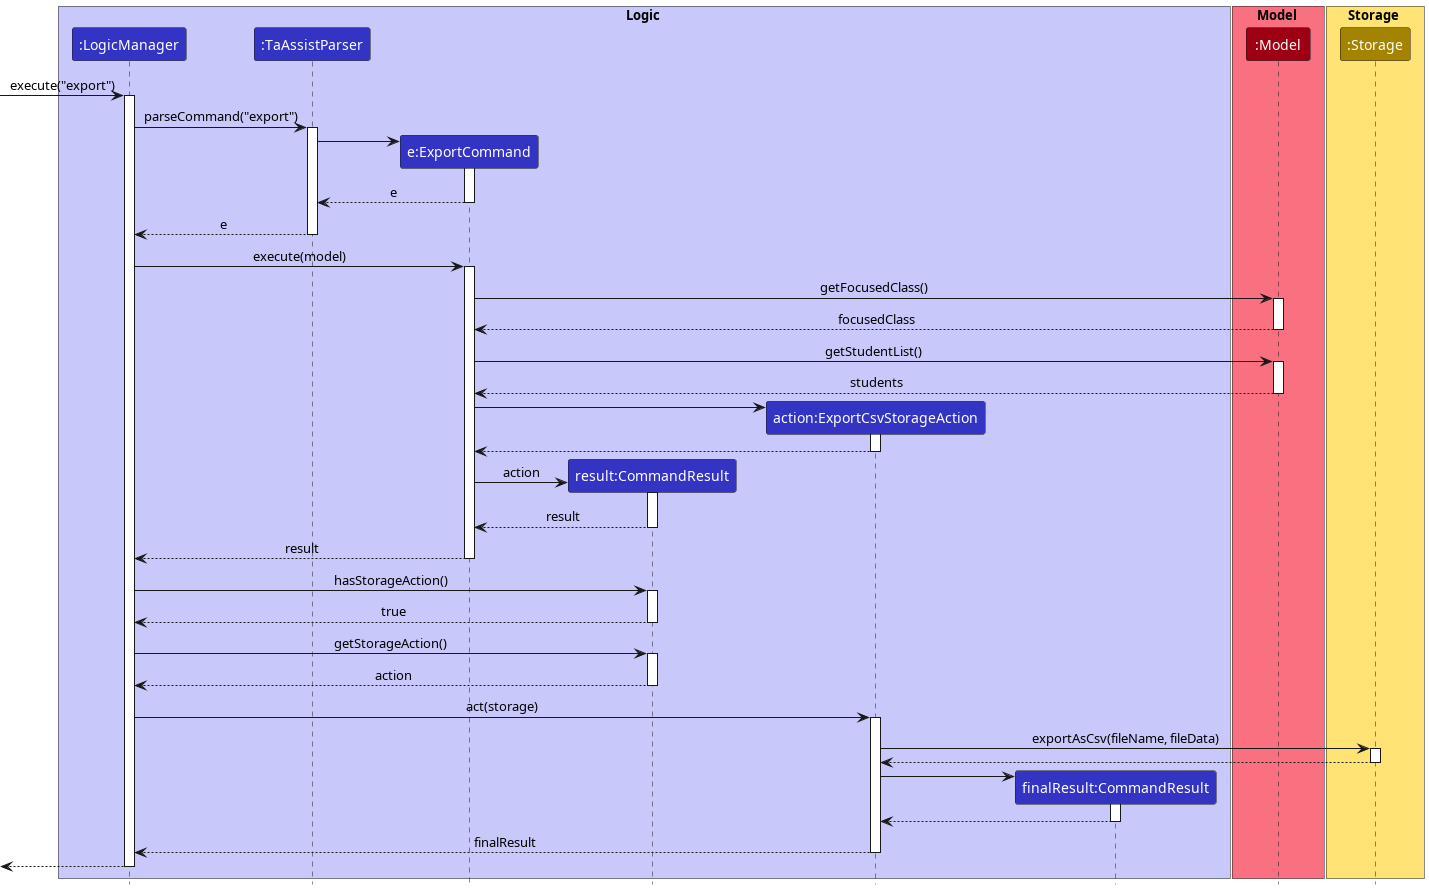
Exporting data as CSV file
This feature allows the user to extract data efficiently from TA-Assist to be used for other purposes such as statistical analysis or result collation on other platforms. Unlike other commands which only works on the Model, the export command requires access to Storage to create a new CSV file and write data to it. This is facilitated by the ExportCsvStorageAction class, which is a children of the StorageAction class, where further action onto the Storage component is processed.
The CommandResult class can contain just the feedback to the user, or it can also contain either a UiAction or StorageAction. These two classes represent an action to be performed by the Ui and Storage respectively.
The ExportCsvStorageAction class is a StorageAction that requests the Storage to export a CSV file.
The following sequence diagram shows how the export command exports a CSV file with the help of Storage:
Design considerations
Aspect: How commands should access the Storage class:
-
Option 1 (Current Choice). Create a new class of objects
StorageActionsto act on theStorageclass.-
Pros: Most commands that does not require access to
Storagewill haveStoragehidden from them. Also, having a classStorageActionswill allow future features updates such as exporting to Excel files be easier to implement. -
Cons: Unable to have commands that act on
Storagefirst before acting onModel.
-
Pros: Most commands that does not require access to
-
Option 2. Let all commands execute with access to both
ModelandStorage.-
Pros: Allows the program to have commands that act on
StorageandModelin any order. -
Cons: Unnecessary exposure of
Storageto other commands that does not require access to it. In our case, this is the majority of the commands.
-
Pros: Allows the program to have commands that act on
UI Implementation
Home Screen
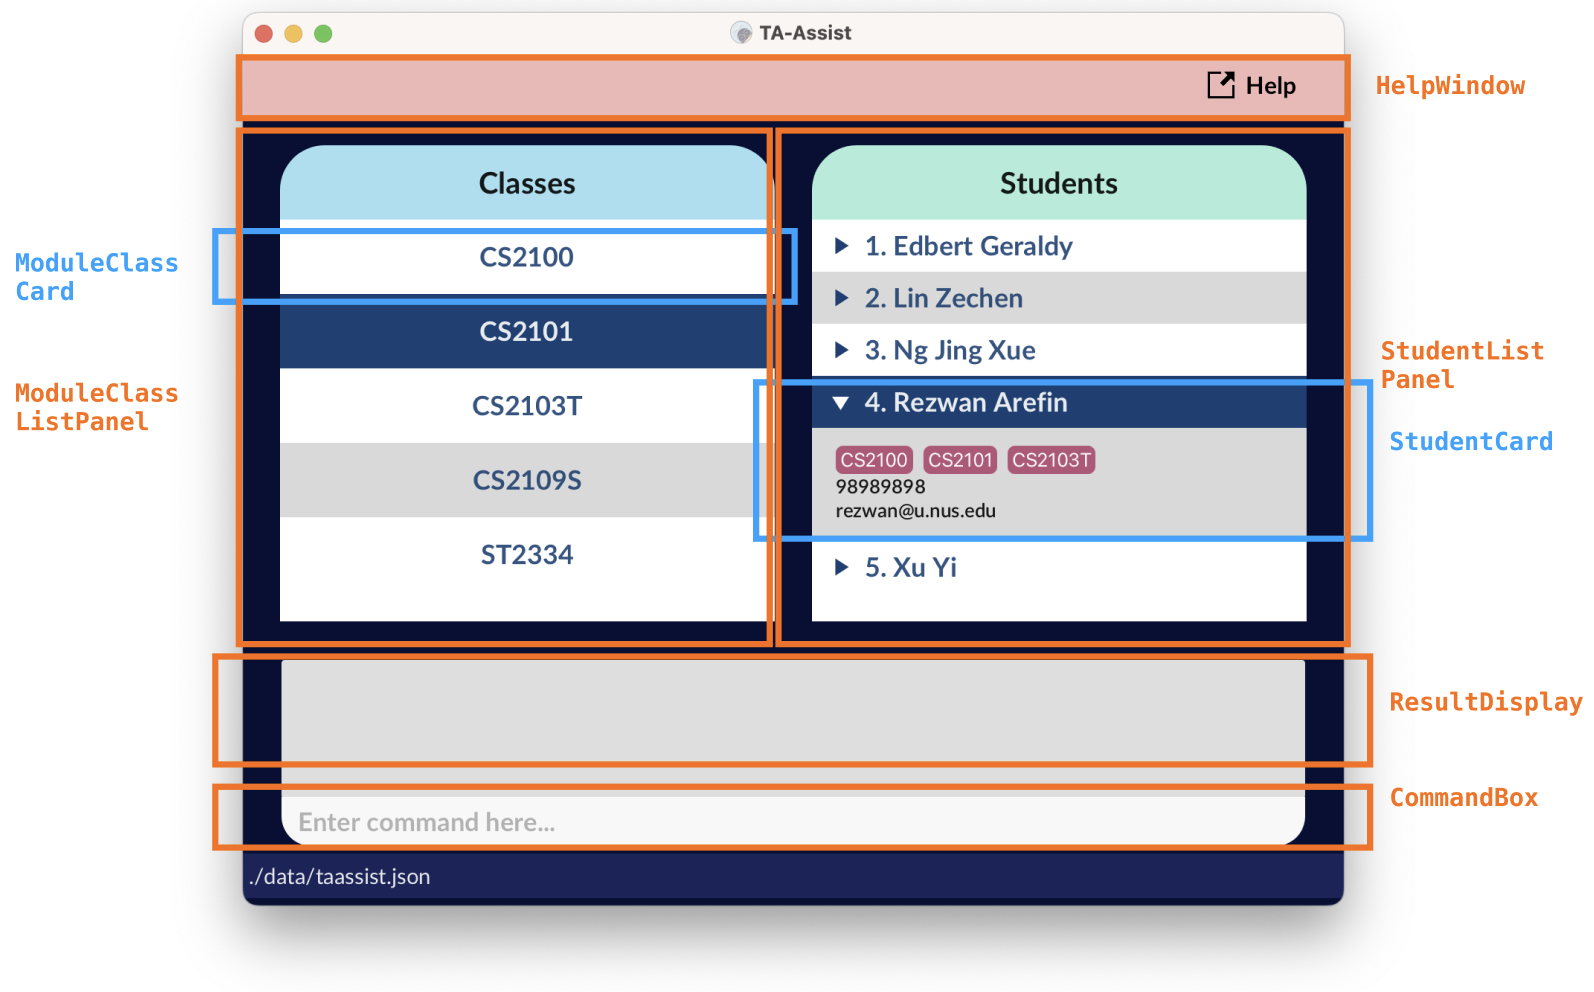
The main screen consists of the following components:
-
ResultDisplayshows the results produced by the command input from the user; -
ModuleClassListPanelshows a list of module classes, eachModuleClassCardrepresents a module class, arranged in alphabetical order; -
StudentListPanelshows a list of student, eachStudentCardrepresents a student, arranged in alphabetical order; -
CommandBox, the Command Line Interface (CLI) for user to key in command and -
HelpWindowshown with a help button, redirect users to our User Guide to facilitate their usage;
It was designed with the following considerations:
- Users have class-oriented focus while using this application. Their actions such as grading/assigning students to a class or initiating sessions revolve around a particular class, therefore we find it suitable to put the classes users have added within the
MainWindow. - Operations on students can be performed conveniently by showing the list of all students on the main window, such as deleting, adding and finding students whenever required.
- As we are targeting users with higher preference on CLI than GUI, putting the command input box at the bottom of the window may be more instinctive for their usage, due to the high similarity with the implementation of command terminals from various operating systems.
Focus Mode

The screen upon entering the focus mode consists of components:
-
ResultDisplay, as aforementioned, shows the results produced by the command input from the user; -
SessionListPanelshows a list of sessions, with eachSessionCardrepresenting a session, sorted based on the most recently added date; -
StudentListPanel, similar to the main screen, shows a list of student, with eachStudentCardrepresenting a student, arranged in alphabetical order; -
CommandBox, the Command Line Interface (CLI) for user to key in command and -
HelpWindowshown with a help button that redirects users to our User Guide to facilitate their usage; a back button that allow user to leave the focus mode; and a header which shows the class the user is currently focused in.
Whenever users call scores s/SESSION_NAME, the grade pertaining to that particular session appear, with ungraded students highlighted in red to the users.
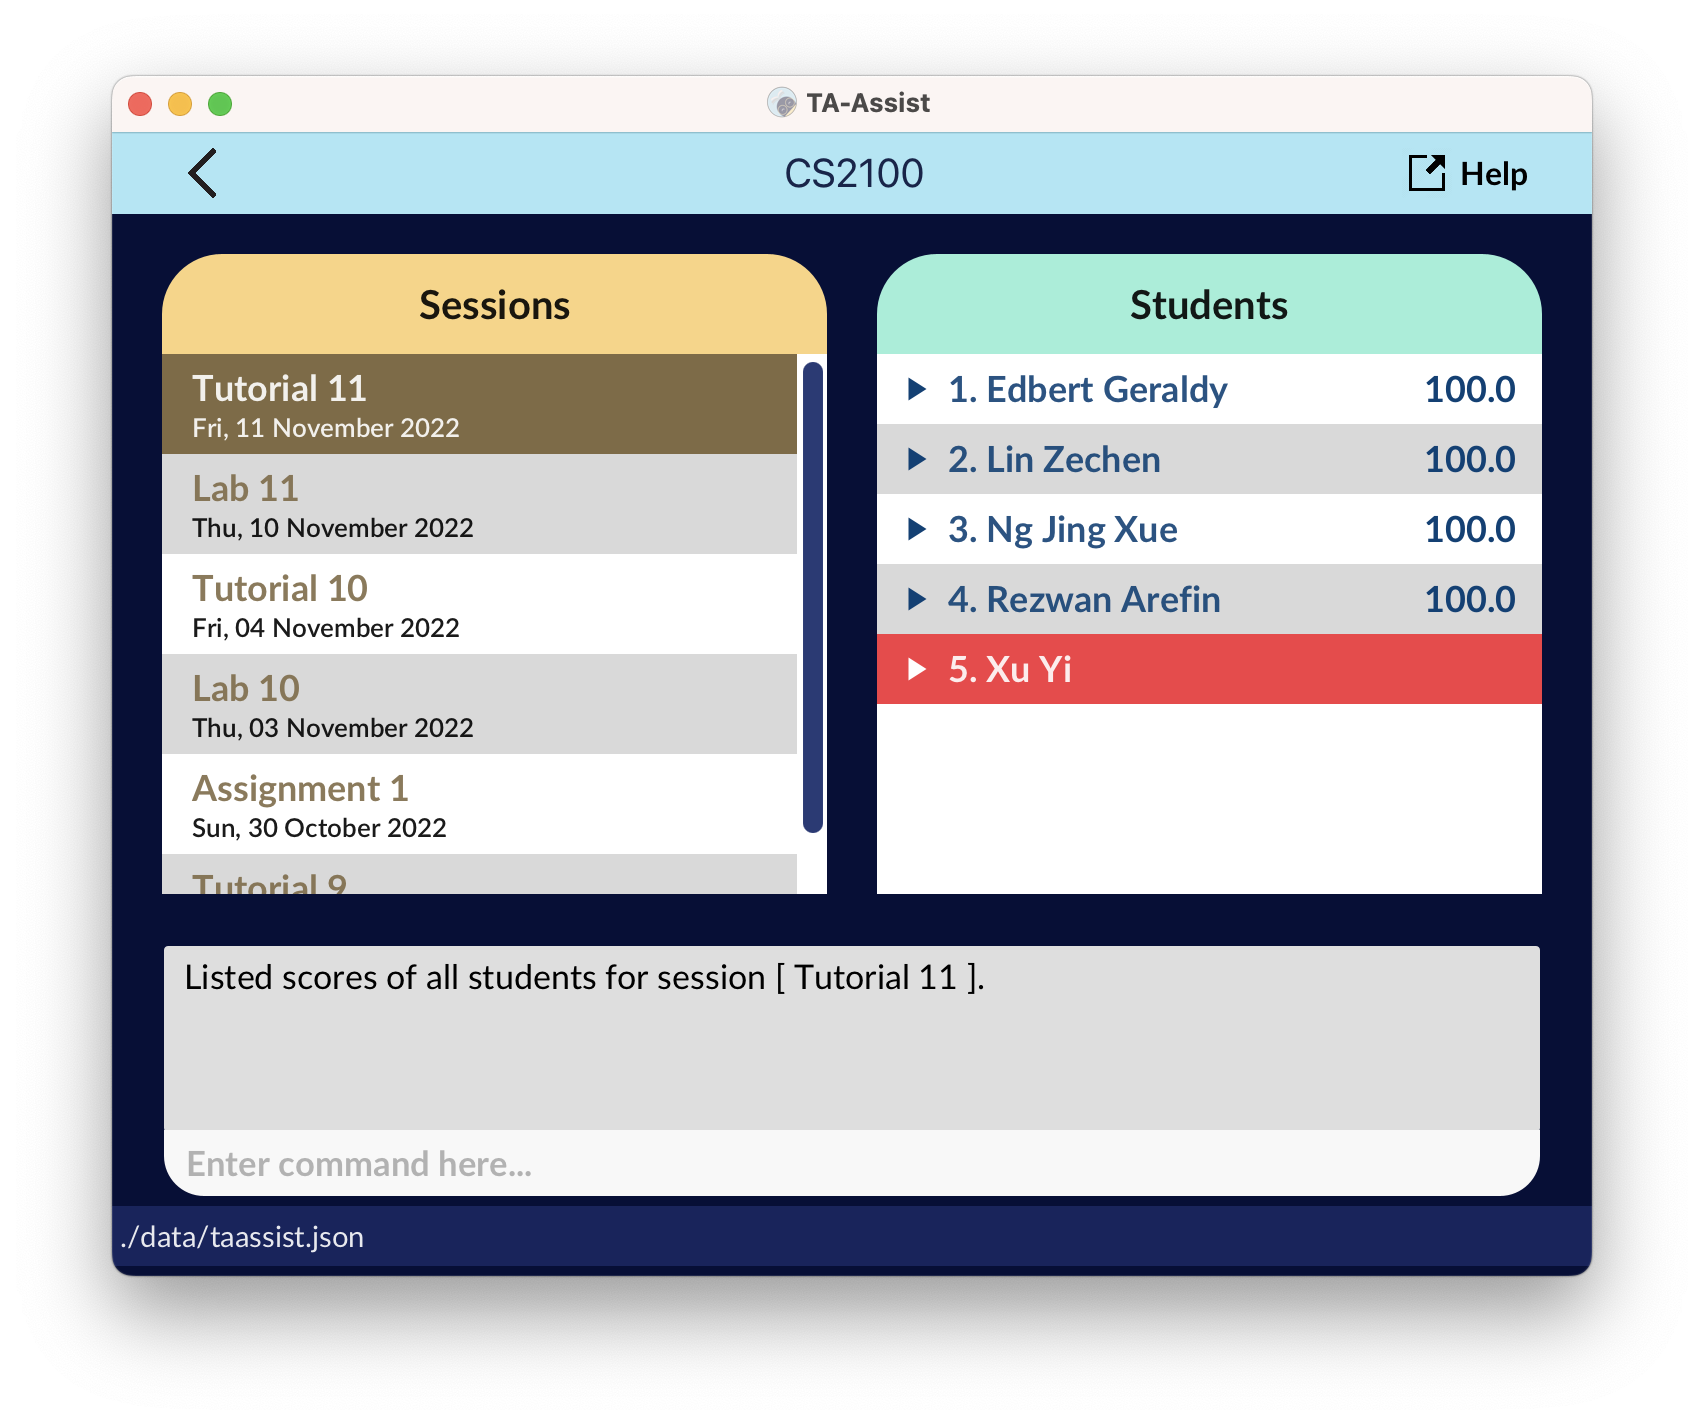
It was designed with the following consideration:
- As sessions are usually time-sensitive, with those added later often being the more relevant sessions, sorting the sessions with the newest session at the front facilitate users in finding the sessions they are concerned with recently.
Documentation, logging, testing, configuration, dev-ops
Appendix: Requirements
Product scope
Target user profile:
- Works as a teaching assistant.
- Has a need to keep track of students’ grades, attendance, and work submission status of relevant modules.
- Prefers desktop apps over other types.
- Can type fast.
- Prefers typing to mouse interactions.
- Is reasonably comfortable using CLI apps.
Value proposition:
- Fast management of students’ grades over the typical GUI-driven app.
- Easy navigation and batch processing with the help of filter and search functionality.
- CSV file generation of student data.
User stories
Priorities: High (must have) - * * *, Medium (nice to have) - * *, Low (unlikely to have) - *
| Priority | As a … | I want to … | So that I can… |
|---|---|---|---|
* * * |
New user | Get help for specific commands | Learn the complete features of a command and know how to use it. |
* * * |
User | Add students to my class | Decide who to have in my class. |
* * * |
User | Delete students from my class | Decide who to have in my class. |
* * * |
User | Give participation points to students | Keep track of their participation in class. |
* * * |
User | Take attendance of my students | Keep track of their class attendance. |
* * * |
User | Delete students from TA-Assist | Keep my list of students concise. |
* * * |
User | View all my classes | See what classes I am teaching. |
* * |
Infrequent user | Remember the last used commands | Quickly find the commands that I need. |
* * |
An expert user | Create macros to perform multiple tasks | Be more efficient at using the system. |
* * |
User | Edit students’ information | Easily and quickly update their information. |
* * * |
User | Create assignments that contribute to CA components | Assign grades to assignments done by students. |
* * |
User | Assign weightage to my created assignments | Estimate the overall performance of my students. |
* * * |
User | Change participation marks previously given to my students | Correctly and accurately reflect the marks for my students. |
Use cases
(For all use cases below, the System is TA-Assist and the Actor is the User, unless specified otherwise)
Use case: UC1 - Enter focus mode for a class
MSS
- User requests to enter focus mode for a class.
- TA-Assist enters focus mode for the class.
- TA-Assist indicates that the user is in the focus mode for the class.
- TA-Assist lists all the students in the class.
-
TA-Assist lists all the sessions in the class.
Use case ends.
Extensions
- *a. User requests to exit focus mode.
- *a1. TA-Assist exits focus mode.
-
*a2. TA-Assist indicates that the user has exited focus mode.
Use case ends.
- 2a. The class does not exist.
-
2a1. TA-Assist tells the user that the class does not exist.
Use case ends
-
-
4a. The list of students is empty.
Use case resumes at step 5.
-
5a. The list of sessions is empty.
Use case ends.
Use case: UC2 - Give a student a score for a session in a class
MSS
- User requests to enter focus mode for a class (UC1).
- User requests to allocate a score for a specific student in the class, for a specific session.
- TA-Assist updates the score for the student.
-
TA-Assist indicates that the score for the student has been updated.
Use case ends.
Extensions
- 3a. The student does not exist in the class.
-
3a1. TA-Assist tells the user that the student does not exist.
Use case ends.
-
- 3b. The session does not exist in the class.
-
3b1. TA-Assist tells the user that the session does not exist.
Use case ends.
-
Use case: UC3 - Add a student
MSS
- User requests to add a student with the specified name and information.
- TA-Assist creates a student with the given name.
-
TA-Assist indicates that the student has been added.
Use case ends.
Extensions
- 2a. The student name is empty.
-
2a1. TA-Assist shows an error message.
Use case ends.
-
- 2b. The student already exists.
-
2b1. TA-Assist tells the user that the student already exists.
Use case ends.
-
- 2c. The student’s phone number, email address, home address and/or class is/are provided.
-
2c1. TA-Assist creates a student with a name along with these information.
Use case resumes at step 3.
-
Use case: UC4 - Delete a student
MSS
- User requests to list students.
- TA-Assist shows a list of students.
- User requests to delete a specific student in the list.
- TA-Assist deletes the student.
-
TA-Assist indicates that the student has been deleted.
Use case ends.
Extensions
-
2a. The list is empty.
Use case ends.
-
3a. The given index is invalid.
-
3a1. TA-Assist indicates that the index is invalid.
Use case resumes at step 2.
-
Use case: UC5 - Create a class
MSS
- User requests to create a new class with the specified class name.
- TA-Assist creates a new class with the given class name.
-
TA-Assist indicates that the class has been created.
Use case ends.
Extensions
- 2a. The class already exists.
-
2a1. TA-Assist tells the user that the class already exists.
Use case ends.
-
- 2b. The class name is empty.
-
2b1. TA-Assist shows an error message.
Use case ends.
-
Use case: UC6 - Create a session in a class
MSS
- User requests to enter focus mode for a class (UC1).
- User requests to create a new session for the class.
- TA-Assist creates a new session for the class.
-
TA-Assist indicates that the session has been created.
Use case ends.
Extensions
- 3a. The session already exists.
-
3a1. TA-Assist tells the user that the session already exists.
Use case ends.
-
- 3b. The session name is empty.
-
3b1. TA-Assist shows an error message.
Use case ends.
-
Non-functional requirements
- Should work on any mainstream OS with Java 11 or above installed.
- Should work without requiring an installer.
- Should not depend on a remote server.
- Should not use a DBMS (Database Management System).
- Should store data in a human editable text file.
- Product JAR file should not exceed 100MB.
- A user with above average typing speed for regular English text (i.e. not code, not system admin commands) should be able to accomplish most of the tasks faster using commands than using the mouse.
- GUI should be usable for screen resolutions of 1280x720 and higher with 150% scaling.
- GUI should work well for screen resolutions of 1920x1080 and higher with 100-125% scaling.
Glossary
- Mainstream OS: Windows, Linux, Unix, and macOS
Appendix: Instructions for manual testing
Given below are instructions to test the app manually.
Launch and shutdown
- Initial launch:
- Download the jar file and copy into an empty folder
- Double-click the jar file
Expected: Shows the GUI with a set of sample students and classes. The window size may not be optimum on certain resolutions.
- Saving window preferences:
- Resize the window to an optimum size. Move the window to a different location. Close the window.
- Re-launch the app by double-clicking the jar file.
Expected: The most recent window size and location is retained.
Deleting a student
- Deleting a student while all students are being shown:
- Prerequisites: List all students using the
listcommand. Multiple students in the list. - Test case:
delete 1
Expected: First contact is deleted from the list. Details of the deleted contact shown in the status message. Timestamp in the status bar is updated. - Test case:
delete 0
Expected: No student is deleted. Error details shown in the status message. Status bar remains the same. - Other incorrect delete commands to try:
delete,delete x,...(where x is larger than the list size)
Expected: Similar to previous.
- Prerequisites: List all students using the
Adding sessions
- Adding a session to a class:
- Prerequisites: The class
CS1231Sexists in TA-Assist without any sessions assigned. TA-Assist is currently in focus mode and is focusing on theCS1231Sclass. - Test case:
adds s/Tut 1
Expected: A session namedTut 1is added with the current system date and is displayed on the session list. - Test case:
adds s/Tut 1 d/2022-01-01
Expected: A session namedTut 1is added with its date set to1st January 2022and is displayed on the session list. - Test case:
adds s/Lab 1 d/2019-02-29
Expected: Session is not created as29th February 2019is not a valid date.
- Prerequisites: The class
- Batch adding sessions to a class:
- Prerequisites: The class
CS1231Sexists in TA-Assist without any sessions assigned. TA-Assist is currently in focus mode and is focusing on theCS1231Sclass. - Test case:
adds s/Tut 2 s/Lab 2
Expected: Two sessions namedTut 2andLab 2is added with the current system date and is displayed on the session list. - Test case:
adds s/Tut 3 s/Lab 3 d/2000-01-01
Expected: Two sessions namedTut 3andLab 3is added with its date set to1st January 2000and is displayed on the session list. - Test case:
adds s/Tut 4 d/2000-02-02 s/Lab 4 d/2020-04-20
Expected: Two sessions namedTut 4andLab 4is added with its date set to20th April 2020and is displayed on the session list.
- Prerequisites: The class
Saving data
- Data file is corrupted:
- Prerequisite: Jar file has been launched and data files have been generated.
- Close the application. Open
data/taassist.jsonand add some random characters. - Re-launch the app.
Expected: An alert box appears stating the data file has been corrupted and queries the user if they want to continue with a new data file.
- Data file is missing:
- Prerequisite: Jar file has been launched and data files have been generated.
- Close the application. Rename
data/taassist.jsontodata/taassist.json.bak. - Re-launch the app.
Expected: TA-Assist launches normally and re-generates the sample data similar to when the application is first launched.
- Recovering accidentally deleted data:
- Pre-requisite: Jar file has been launched previously and data files have been generated.
- Modify or delete some data using the application.
- Close the application. Rename
data/taassist.json.baktodata/taassist.json. - Re-launch the app.
Expected: TA-Assist copied the data from
data/taassist.jsontodata/taassist.json.bakat launch. After following the instructions, data before modification is recovered.